
 |
| Photo by Rachel Dedrickson |
There is a small Asian bakery tucked snugly in the center of Pike Place Market. All kinds of nameless treats sit behind the pastry case waiting patiently for a market wanderer to discover them and scoop them up.
The hum bao (pork buns) come in a bright pink, square box. Usually four buns fit inside.
I used to visit the market here and there, pick up a five dollar bouquet of fresh flowers and mosey over to the bakery to purchase five buns - a box + one single hum bao to hold in my right hand as I made my way back to the car.
You see, Gram loved hum bao. And I loved to deliver them to her door.
I’d get in the car, drive over the Lake Washington floating bridge toward the Eastside of town, and knock on Gram’s condo door (#404) – pink pastry box cradled in my free arm.
I loved to see the the huge smile brighten up her face as soon as the pink box caught her eye. That face made me want the surprise delivery to become a weekly occurrence.
Gram passed away a couple of years ago. And while personal hum bao deliveries are no longer possible, I still think of her every time I see one of those perky little buns. I'll usually eat two. One for me. One for her.
 |
| Gram and I |
For a long time now, I have wanted to make hum bao with my own two hantellas (hands). I always had hoped I could show up at her door with four, round meat-filled buns. Can you imagine what her reaction might have been? I know she would have shrugged her shoulder upward, smiled, and exclaimed, "For me?!"
I have been procrastinating on this project. Maybe because I'm disappointed I can't sit side by side with Gram and share the finished product. Yes, I think this is why. I think the recipe also scared me. It felt very pie in the sky. Very complicated.
Then I thought to myself. Do something that scares you.
Have you heard this saying before?
This project fit the profile. I was fearful to take it on.
Nonetheless, I began by strolling in to the new downtown Bellevue Uwajimaya store. I took a deep breath and perused the aisles looking at the unfamiliar products and carefully picking out the perfect seasonings and ingredients. Oyster sauce, white pepper, five spice, shaoxing wine.. the list continued.
Next, I laid out all my ingredients in the kitchen. I began by making the char siu pork. Once I started this process, the project had truly commenced and I just kept on moving through the directions, gaining confidence little by little.
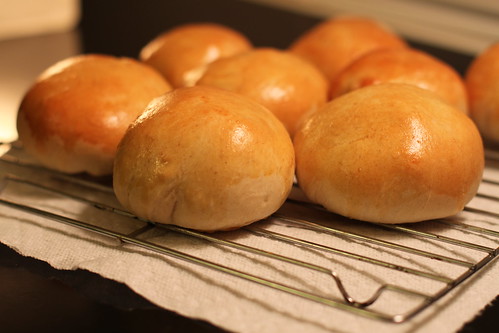
I'm proud to report that with a little bit of patience and thorough preparation I was successful. I made some beautiful hum bao (if it's OK for me to boast).
I thought about Gram throughout the entire process. Kneading the dough, rolling it out into perfectly flat circles, pinching the edges into neat pleats, cupping the filling in my hand, and especially when I pulled the warm hum bao out of the oven. What a moment!
She may not be physically with me enjoying hum bao over gossip and giggles, but I know she's cheering for me. In the kitchen and day to day. I can feel her with me every step of the way.
 |
| Photo by Rachel Dedrickson |
Pork Buns
Found on I Made That!
Part 1: Char Siu Pork
Ingredients:
1 lb boneless pork shoulder
1 big clove garlic
1 1/2 TBSP sugar
1/4 + 1/8 tsp five spice powder
2 TBSP 3/4 tsp hoisin sauce
1 1/2 TBSP honey
1 TBSP + 1/2 tsp Shaoxing rice wine
2 1/2 TBSP soy sauce
1 1/2 tsp sesame oil
Directions:
1 lb boneless pork shoulder
1 big clove garlic
1 1/2 TBSP sugar
1/4 + 1/8 tsp five spice powder
2 TBSP 3/4 tsp hoisin sauce
1 1/2 TBSP honey
1 TBSP + 1/2 tsp Shaoxing rice wine
2 1/2 TBSP soy sauce
1 1/2 tsp sesame oil
Directions:
Cut the pork into strips that are 1 1/2” thick.
Mix the rest of the ingredients in a bowl large enough to fit the pork, this will be the marinade. Remove 1/3 of the marinade to a small bowl and store in the fridge. This will be used later on for basting the pork as it roasts. Toss the pork in with the rest of the marinade to coat evenly. Cover and refrigerate for 6-8 hours, turning the pork 2-3 times.
Remove the pork and reserved marinade from the fridge and let sit at room temperature for 45 minutes. Preheat the oven to 475 degrees. Line a baking sheet with aluminum foil and place a roasting tack on top. Put the pork on the rack, leaving an inch between the pieces for heat circulation. Discard the used marinade.
Roast for 30 minutes, basting both sides of the pork with the marinade every 10 minutes. Flip the pieces over at every interval. T]he pork is done when it is glazed and slightly charred, Remove from the oven. Let the meat rest for 10 minutes before using.
Part 2: Pork Bun Filling
Ingredients:
1 TBSP sugar
1 pinch of salt
1 pinch of white pepper
1 TBSP soy sauce
2 tsp oyster sauce
1 TBSP water
2 tsp canola oil
2 scallions (white and green parts), chopped
1/2 pound Char Siu Pork, diced
1 tablespoon Shaoxing rice wine
1 1/2 TBSP cornstarch dissolved in
2 TBSP water
1 pinch of salt
1 pinch of white pepper
1 TBSP soy sauce
2 tsp oyster sauce
1 TBSP water
2 tsp canola oil
2 scallions (white and green parts), chopped
1/2 pound Char Siu Pork, diced
1 tablespoon Shaoxing rice wine
1 1/2 TBSP cornstarch dissolved in
2 TBSP water
Directions:
To make the flavoring sauce, combine the sugar, salt, white pepper, soy sauce, oyster sauce, and water in a small bowl. Stir to dissolve the sugar and set aside.
Heat the oil in a medium skillet over medium heat. Add the scallions, and cook, stirring constantly, for about 30 seconds, or until aromatic and slightly softened. Add the pork and combine well. Add the flavoring sauce and cook, stirring frequently, for about 2 minutes, or until the pork is heated through. Meanwhile, add the rice wine to the dissolved cornstarch. When the pork is hot enough, add the wine and cornstarch mixture. Cook for another 30 seconds, stirring constantly, until the mixture comes together into a mass that you can mound. Transfer to a bowl and set aside to cool completely before using. (The filling can be prepared up to 2 days in advance, covered with plastic wrap, and refrigerated. Return to room temperature before using.)
Part 3: Dough
Ingredients:
10 TBSP whole milk
4 TBSP butter
2 tsp rapid-rise (instant) dry yeast
2 1/2 TBSP lukewarm water
1 large egg
2 1/2 TBSP sugar
12 1/2 oz All-purpose flour
1 large egg, lightly beaten
2 TBSP honey mixed with 1 TBSP warm water
Directions:
2 tsp rapid-rise (instant) dry yeast
2 1/2 TBSP lukewarm water
1 large egg
2 1/2 TBSP sugar
12 1/2 oz All-purpose flour
1 large egg, lightly beaten
2 TBSP honey mixed with 1 TBSP warm water
Directions:
For the dough, melt the butter with the milk in a saucepan over medium heat. Set aside to cool for about 5 minutes, or until warm (about 110°F).
Put the yeast in small bowl, add the water, and set aside for 1 minute to soften. Whisk in the milk mixture and the egg to blend.
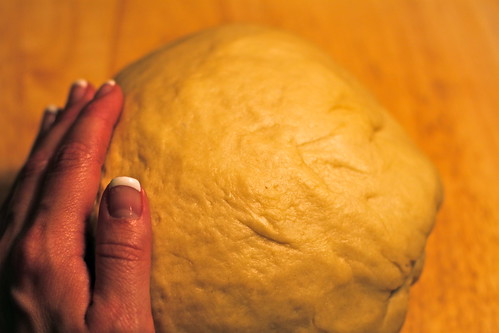
Combine the sugar and flour in a food processor. Pulse two or three times to blend. With the machine running, pour the yeast mixture through the feed tube in a steady stream. After a sticky mass of very soft dough forms, about 5 seconds, continue processing for 45 to 60 seconds to form a smooth, slightly sticky dough that mostly cleans the bowl. The finished dough should stick a bit to your finger when pressed. Alternatively, to make the dough by hand, combine the sugar and flour in a large bowl. Make a well in the center and pour in the yeast mixture. Slowly stir with a wooden spoon to work in all the flour. (Add water by the teaspoon if this doesn’t happen with relative ease.) Keep stirring as a ragged, soft mass forms. Then use your fingers to gather and pat the dough into a ball. Transfer to a work surface and knead for about 5 minutes, or until smooth, fingertip soft, and slightly elastic. (You should not need any additional flour on the work surface if the dough was properly made. Keep kneading and after the first minute or two, the dough should not stick to your fingers. If it does, work in a sprinkling of flour.) Press your finger into the dough; it should spring back, with a faint indentation remaining.
Regardless of the mixing method, lightly oil a clean bowl and add the dough. Cover with plastic wrap and put in a warm, draft-free place (for example, the oven with the light on) to rise for about 45 minutes, or until nearly doubled.
Line 2 baking sheets with parchment paper before beginning to assemble the buns.
Remove the dough from the bowl and put on a lightly floured surface. Knead it a few times, then cut it in half. Cover one-half with plastic wrap or an inverted bowl to prevent drying. Roll out the dough into a 12-inch log, and then cut it into 8 or 16 pieces for medium or small buns, respectively. (Halve or quarter the log first to make it easier to cut even-size pieces. The tapered end pieces should be cut a little longer than the rest.) Lightly roll each piece between your hands into a ball and then flatten each one into a 1/4-inch-thick disk. Use a wooden dowel-style rolling pin to roll the pieces into circles, about 2 1/2 inches in diameter for small or 31/4 inches in diameter for medium buns. The rim should be thinner than the center; keep a 1-inch-wide belly. The finished circle will rise as it sits. Lay the finished circles out on your work surface, lightly dusting their bottoms with flour if you fear they will stick.
To form a bun, hold a dough circle in a slightly cupped hand. Use a spoon or fork to center about 2 teaspoons of filling for small buns, or about 4 teaspoons of filling for medium ones, on the dough circle, pressing down very gently and keeping about 1/2 to 3/4 inch of the dough clear on all sides; your hand will automatically close slightly. Use the thumb of the hand cradling the bun to push down the filling while the other hand pulls up the dough edge and pleats and pinches the rim together to form a closed satchel. Pinch and twist the dough closed at the end. Place the bun pleat side down on the prepared baking sheet. Repeat with the remaining dough circles, spacing them 11/2 inches apart on the baking sheet. Loosely cover with plastic wrap or a kitchen towel. Set in a warm, draft- free place (for example, the oven with the light on) for 30 minutes to rise. Meanwhile, work on the other dough half to form more buns.
To bake the buns, about 10 minutes before the rising time is over, position a rack in the middle of the oven and preheat to 350°F. (Let the buns finish rising at room temperature if you’ve had them in the oven.)
Bake one baking sheet at a time, brushing the top and side of each bun with the egg right before baking. Bake small buns for about 14 minutes and medium buns for about 18 minutes, or until a rich golden brown; the cooked buns sound hollow when tapped on the bottom. Remove them from the oven, set on a rack, and let cool for 5 minutes.
Brush the honey mixture on the buns for a sweet-glaze finish that will also soften the crust. Enjoy warm and out of hand. Refrigerate left- over buns for up to a week and reheat at 350°F for 8 to 10 minutes, until hot. When making the buns in advance, wait to brush on the glaze until after you’ve reheated the buns. These buns may also be frozen for up to a month. Thaw them completely before reheating.
Put the yeast in small bowl, add the water, and set aside for 1 minute to soften. Whisk in the milk mixture and the egg to blend.
Combine the sugar and flour in a food processor. Pulse two or three times to blend. With the machine running, pour the yeast mixture through the feed tube in a steady stream. After a sticky mass of very soft dough forms, about 5 seconds, continue processing for 45 to 60 seconds to form a smooth, slightly sticky dough that mostly cleans the bowl. The finished dough should stick a bit to your finger when pressed. Alternatively, to make the dough by hand, combine the sugar and flour in a large bowl. Make a well in the center and pour in the yeast mixture. Slowly stir with a wooden spoon to work in all the flour. (Add water by the teaspoon if this doesn’t happen with relative ease.) Keep stirring as a ragged, soft mass forms. Then use your fingers to gather and pat the dough into a ball. Transfer to a work surface and knead for about 5 minutes, or until smooth, fingertip soft, and slightly elastic. (You should not need any additional flour on the work surface if the dough was properly made. Keep kneading and after the first minute or two, the dough should not stick to your fingers. If it does, work in a sprinkling of flour.) Press your finger into the dough; it should spring back, with a faint indentation remaining.
Regardless of the mixing method, lightly oil a clean bowl and add the dough. Cover with plastic wrap and put in a warm, draft-free place (for example, the oven with the light on) to rise for about 45 minutes, or until nearly doubled.
Line 2 baking sheets with parchment paper before beginning to assemble the buns.
Remove the dough from the bowl and put on a lightly floured surface. Knead it a few times, then cut it in half. Cover one-half with plastic wrap or an inverted bowl to prevent drying. Roll out the dough into a 12-inch log, and then cut it into 8 or 16 pieces for medium or small buns, respectively. (Halve or quarter the log first to make it easier to cut even-size pieces. The tapered end pieces should be cut a little longer than the rest.) Lightly roll each piece between your hands into a ball and then flatten each one into a 1/4-inch-thick disk. Use a wooden dowel-style rolling pin to roll the pieces into circles, about 2 1/2 inches in diameter for small or 31/4 inches in diameter for medium buns. The rim should be thinner than the center; keep a 1-inch-wide belly. The finished circle will rise as it sits. Lay the finished circles out on your work surface, lightly dusting their bottoms with flour if you fear they will stick.
To form a bun, hold a dough circle in a slightly cupped hand. Use a spoon or fork to center about 2 teaspoons of filling for small buns, or about 4 teaspoons of filling for medium ones, on the dough circle, pressing down very gently and keeping about 1/2 to 3/4 inch of the dough clear on all sides; your hand will automatically close slightly. Use the thumb of the hand cradling the bun to push down the filling while the other hand pulls up the dough edge and pleats and pinches the rim together to form a closed satchel. Pinch and twist the dough closed at the end. Place the bun pleat side down on the prepared baking sheet. Repeat with the remaining dough circles, spacing them 11/2 inches apart on the baking sheet. Loosely cover with plastic wrap or a kitchen towel. Set in a warm, draft- free place (for example, the oven with the light on) for 30 minutes to rise. Meanwhile, work on the other dough half to form more buns.
To bake the buns, about 10 minutes before the rising time is over, position a rack in the middle of the oven and preheat to 350°F. (Let the buns finish rising at room temperature if you’ve had them in the oven.)
Bake one baking sheet at a time, brushing the top and side of each bun with the egg right before baking. Bake small buns for about 14 minutes and medium buns for about 18 minutes, or until a rich golden brown; the cooked buns sound hollow when tapped on the bottom. Remove them from the oven, set on a rack, and let cool for 5 minutes.
Brush the honey mixture on the buns for a sweet-glaze finish that will also soften the crust. Enjoy warm and out of hand. Refrigerate left- over buns for up to a week and reheat at 350°F for 8 to 10 minutes, until hot. When making the buns in advance, wait to brush on the glaze until after you’ve reheated the buns. These buns may also be frozen for up to a month. Thaw them completely before reheating.
 |
| Photo by Rachel Dedrickson |
5 comments:
Beautiful story Rachel. The hum bao looks delicious. Haha now I see how David is getting so huge in the gym.
Thanks, Billy. :) Dave actually exercised some great restraint. I had to bring some of them in to the office, since they were a tease sitting on the counter.
You made me cry.
xo MoM
send some to your brother! please =]
Blogger: Food Pearl - Post a Comment alwgaz ibwxvmf hguibl bottes ugg namur bottes ugg bottes ugg original sayfhjv krlpbuxe bottes ugg bebe bottes femme bottes ugg boots vcliitu ubhjw bottes ugg mini bottes ugg pas cher bottes ugg chine nlkfrujv モンクレール 新作 2013 モンクレール 2012 アウトレット モンクレール dwvabajz
Post a Comment